Configure Low Cost AWS NAT Gateway, using CDK
Issue with AWS NAT Gateway
A few years ago AWS announced the managed NAT Gateway service. The Pros are obvious - you get Internet connectivity for your Private Subnets without having to manage and operate the NAT EC2 Instances. Our Servers need Internet, and if we can get it as a service - great, less work for us.

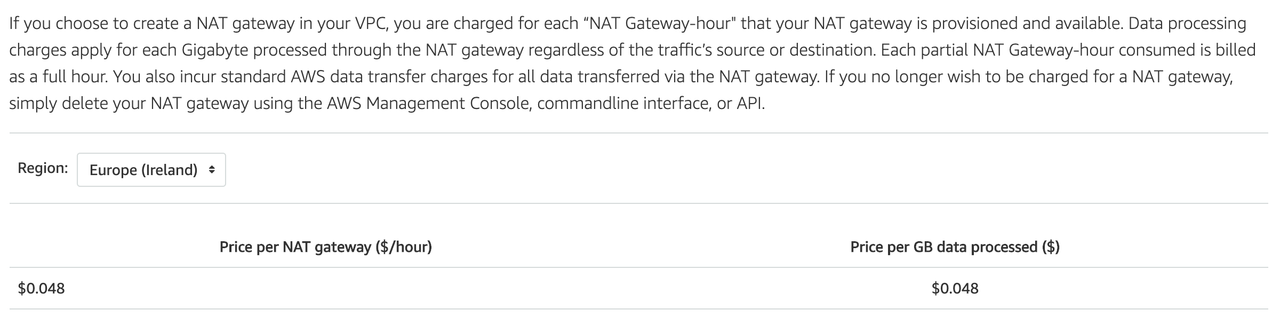
How much will this cost us? According to the image below, in Ireland - 0.048$ per hour + 0.048$ per GB processed. This means that we have 30 days x 24 hours x 0.048$ = approx 35 $ per month, per NAT GW. So, in most common case (2 Private Subnets, 1 per AZs) we have two options:
- Create two NAT GWs, one per Availability Zone, and pay 70$ per month + data processing.
- Create just one NAT GW, and pay inter-AZ data transfer costs (5 cents per GB out of a AZ, and 5 cents into another AZ = 10 cents per GB, of all Internet traffic within one of our Private Subnets).
If we’re running production workloads, maybe a SAP environment with 50+ EC2 Instances - this is a good deal. Plus, no operational overhead. But what if, like in my company, you have 100 AWS Accounts, out of which over 70% are Dev and QA? Only NAT GW sums up a pretty “decent” sum, every month.
AWS will put these under your “EC2” section. Here is how one of our Dev accounts looks like, recently provisioned. The only cost it has is NAT GW:
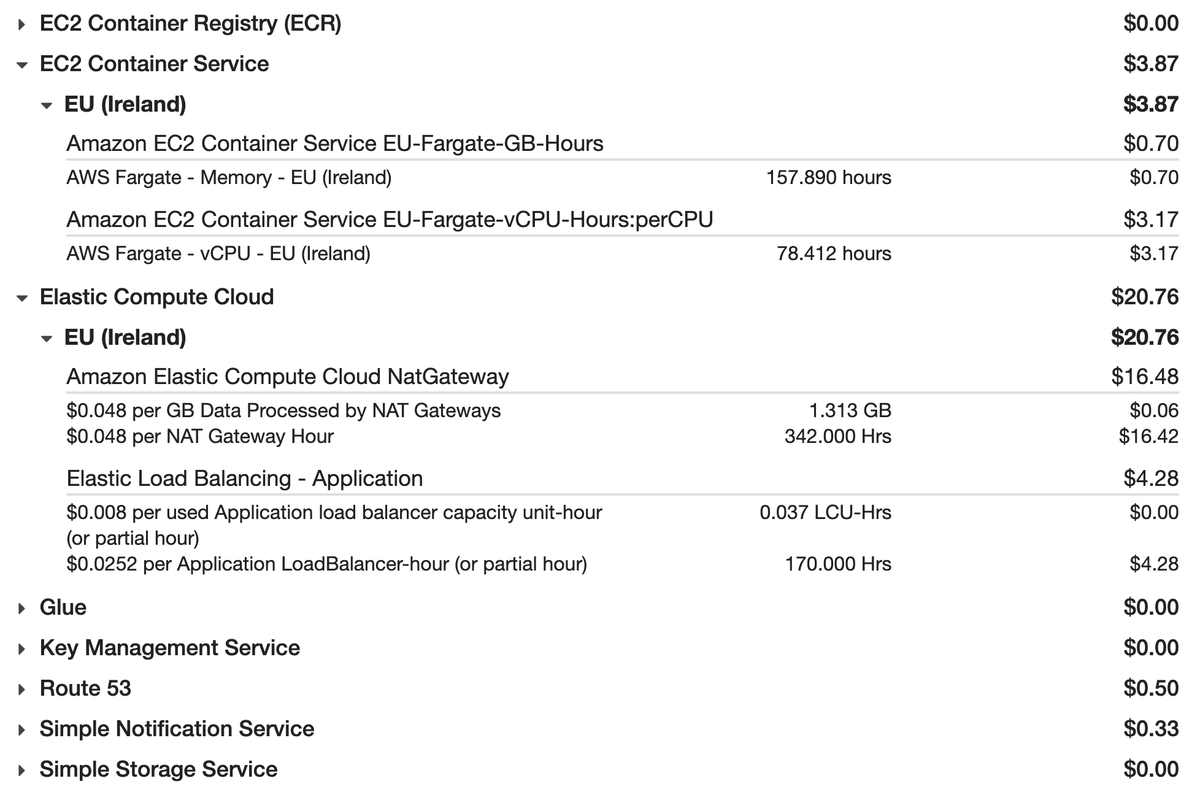
Luckily, there is a solution…
How to reduce 70$ a month to 5$ a month
The idea is simple: instead of running a NAT GW, we create a cheap EC2 Instance, and configure it as a NAT GW. We can choose a cheap EC2 type, as even most of the nano have 5-10 Gbps, which is a decent enough throughput for Internet access in a Dev environment. In this example, I’ll use T3 nano, which costs around 5/7$ a month. If you Reserve it or apply Saving Plans, you can be down to 2$ a month.
Official NAT Gateway Architecture
NAT Gateway us placed in the Public Subnet, so it would get a Public IP. Private Subnet Routing Table therefore needs to point to a NAT EC2 INstance to get to 0.0.0.0/0 (Internet, or Default Route), as shown on the diagram below.
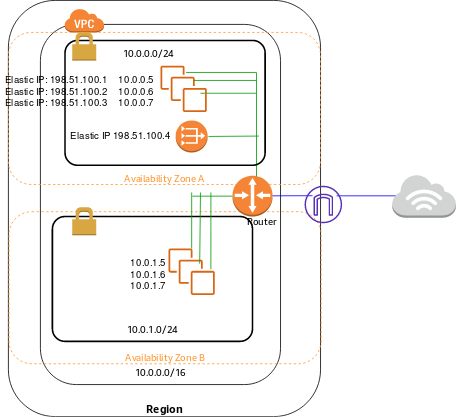
We basically need to replicate all this, and create a Python script using AWS CDK, so we can easily apply it to all our Dev and QA accounts.
Configuration
AWS CDK
I’ll assume you’re all familiar with AWS CDK. If not, you need to check out my post about how to get started, as it most definitely presents the future of Infrastructure as Code, as it brings the best of both worlds - Indicative and Declarative programming.
At this step, you need to have a CDK stack in Python, your initial CDK stack needs to be deployed, as shown below:
(.env) ➜  iac git:(dev) ✗ cdk diff
Stack UnicornIaC
There were no differences
(.env) ➜  iac git:(dev) ✗
You only need to import EC2 for both VPC and EC2:
from aws_cdk import aws_ec2 as ec2
Create VPC or delete the existing NAT GW
CDK is beautiful. Just check out the following line of code:
vpc = ec2.Vpc(self, "UnicornVPC", max_azs=2)
This will create:
- A VPC with
10.0.0.0/16subnet. - Two PUBLIC
/18Subnets, Internet Gateway, and a Default Route to IGW. - Two PRIVATE
/18Subnets, two NAT Gateways in Public Subnets, and a Route from each Private Subnet’s Routing Table to a NAT Gateway in that AZ.
While this is the best practice, what we’re trying to do is not create 2 NAT GWs. The best way to do this is to specify VPC parameters ourselves, and instead of PRIVATE Subnet that automatically creates a NAT GW - we can use ISOLATED, and add the NAT Instance and the route ourselves.
Our final VPC code will look like this (you can leave our the cidr_mask parameter if you want CDK to automatically assing MAX values to each of the 4 subnets):
vpc = ec2.Vpc(self, "LowCostVPC",
     max_azs=2,
     cidr="10.0.0.0/16",
     nat_gateways=None,
     subnet_configuration=[ec2.SubnetConfiguration(
   subnet_type=ec2.SubnetType.PUBLIC,
   name="Public",
   cidr_mask=24,
 ), ec2.SubnetConfiguration(
   subnet_type=ec2.SubnetType.ISOLATED,
   name="Isolated",
   cidr_mask=24,
 )
 ],
)
This will create 4 Subnets: 2 Public with an Internet gateway, and 2 Isolated with NO Default Route.
Disable Source/Destination Check
Each EC2 instance performs source/destination checks by default. This means that the instance must be the source or destination of any traffic it sends or receives. However, a NAT instance must be able to send and receive traffic when the source or destination is not itself. Therefore, you must disable source/destination checks on the NAT instance.
To disable the source/destination check, we simply need to include source_dest_check=False in the EC2 Instance creation call.
Create EC2 NAT Instance
The easiest way to create a NAT Instance would be to use a standard Amazon Linux, and to reduce cost without penalizing bandwidth too much - we can use a T3 nano instance type. We’ll call our instance NAT, and we’ll create only one since our main objective is to reduce cost (goes without saying that you can create one per AZ).
We also need to indicate that we’ll be using LINUX type user data. We’ll add the commands later.
 linux_ami = ec2.AmazonLinuxImage(generation=ec2.AmazonLinuxGeneration.AMAZON_LINUX,
     edition=ec2.AmazonLinuxEdition.STANDARD,
     virtualization=ec2.AmazonLinuxVirt.HVM,
     storage=ec2.AmazonLinuxStorage.GENERAL_PURPOSE
     )

 nat_ec2 = ec2.Instance(self, "NAT",
     instance_name="NAT",
     vpc=vpc,
     vpc_subnets=ec2.SubnetSelection(subnet_type=ec2.SubnetType.PUBLIC),
     instance_type=ec2.InstanceType(instance_type_identifier="t3.nano"),
     machine_image=linux_ami,
     user_data=ec2.UserData.for_linux(),
     source_dest_check=False,
 )
Configure your EC2 to perform NAT
There are many options, but this one was created and verified by one of the most popular posts on the topic, so - we’ll go with that one. We’ve already got the source/destination check disabled, so we just need to add the following commands, using the user_data.add_commands method:
nat_ec2.user_data.add_commands("sysctl -w net.ipv4.ip_forward=1")
nat_ec2.user_data.add_commands("/sbin/iptables -t nat -A POSTROUTING -o eth0 -j MASQUERADE")
At this moment, you should already try to do a cdk synth and export it to a file (cdk synth > cf_test.yaml), and make sure the EC2 Instance part looks something like this:
 UserData:
   Fn::Base64: >-
     #!/bin/bash
     sysctl -w net.ipv4.ip_forward=1
     /sbin/iptables -t nat -A POSTROUTING -o eth0 -j MASQUERADE
Don’t worry if you spaces between the commands, this will dissapear in the CloudFormation.
Add Default Static Route to Private Subnet Routing Table
Now, for the final Ninja move (and I’m saying this just cause it took me a lot of time to “guess” how to do this, using the official Python CDK documentation).

We need to make sure our Internet traffic from the Private Subnet, is directed to our NAT EC2 instance. This means that we need to find a way to reference a Routing Table of each of our Private (ISOLATED actually) subnets, and add a Route pointing to our NAT GW, therefore making those Subnets Private, instead of Isolated.
This is how I managed to do it. I really struggled with this, but I think it turned out pretty elegant. What this script does is:
- Defines a
selectionvariable, creating an array with both ISOLATED Subnets. - Loops through the subnets using
for loop, and adds a new default route. - Parameters we need are
router_idwhich represents an EC2 Instance,router_typewhich is a type of a Resource new route points to (we need it to be INSTANCE).
selection = vpc.select_subnets(
  subnet_type=ec2.SubnetType.ISOLATED
)

for subnet in selection.subnets:
  subnet.add_route("DefaultNAT",
    router_id=nat_ec2.instance_id,
    router_type=ec2.RouterType.INSTANCE,
    destination_cidr_block="0.0.0.0/0"
)
Security Group
By default, CDK will create a Security Group that allows all outbound traffic, and attach it to your EC2 Instance. We now need to take care of the Inbound traffic. My recommendation is to always understand the IP Flow before you create the Inbound Rules. In case of Unicorn Pursuit docker-ized application that we’re building on Unicorn Workshop on Mats Cloud, the flow will be coming from the Container in ECS Fargate, meaning - we’ll want an Inbound rule that:
- Only allows HTTPS
- Only allows ECS Fargate Service Security Group as an Origin.
This means that in our code, we need to add an Inbound rule to the Security Group that CDK already created, when creating a NAT EC2 Instance.
# Update NAT EC2 Security Group, to allow only HTTPS from Fargate Service Security Group.
nat_ec2.connections.security_groups[0].add_ingress_rule(
    peer = fargate_service.service.connections.security_groups[0],
    connection = ec2.Port.tcp(443),
    description="Allow https from Fargate Service"
)
To check out more details on how this Fargate service was created, check out one of my previous posts on Fargate. The most important fact here is the peer parameter, which references a Security Group. If, instead of Fargate, you want to reference a Security Group attached to another VM (EC2), you’d say your_instance.connections.security_groups[0].
The final check, go to AWS Console > EC2 > Security Groups and find the Security Group with a name NAT. You should be seeing something similar to this:

Don’t forget to either always update the NAT EC2 Security Group when you add VMs or Containers in private Subnets. Another option is to just add your entire VPC Subnet as an Origin, if you don’t share responsibility of the account with other teams - it might not be a bad option.
How much did we save?
Let’s get to the new AWS Cost Calculator tool and choose the EC2 Service. As mentioned before, a T3 Nano with 10GB of general purpose SSD on EBS would be quite sufficient for what we need in a Dev environment.

On-demand price would be 5.26 dollars. But, NAT GW is something we’ll probably never turn off, so let’s see what happens if we commit to a 1 year, using EC2 Saving Plans.
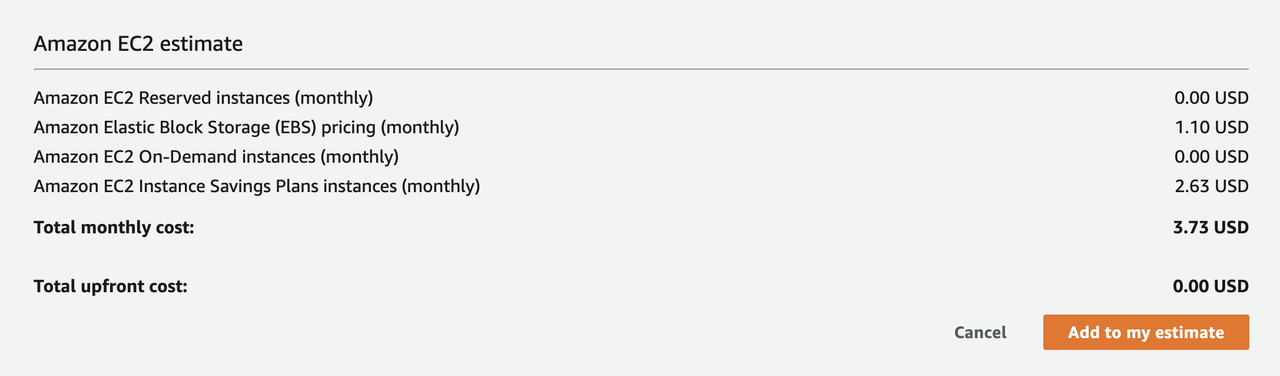
Wow, we’re down to 3.73 dollars a month.
What about… 1 year commitment, all upfront?

1.1 dollars per month!!! Insane, right? Down from the default 70 per month… and thats for EACH VPC in our organization.
Where to find more info
The entire Unicorn Pursuit code is available on this GitHub Repository:
- Unicorn Pursuit was written in Golang with AWS SDK for GO. That’s in
root. - In
IACfolder you’ll find the entire AWS Infrastructure, written using AWS CDK with Python. The code on this post is used there. - Unicorn Workshop will help you become a Cloud Ninja, so feel free to do it, it’s 100% FREE.