Cognito
If you’ve just landed here, we’re doing a “Become a Cloud Architect” Unicorn Workshop by building a Unicorn Pursuit Web App step by step, and you’re more then welcome to join!
About Cognito
Amazon Cognito provides authentication, authorization, and user management for your web and mobile apps. Your users can sign in directly with a user name and password, or through a third party such as Facebook, Amazon, Google or Apple.
The two main components of Amazon Cognito are:
- User pools, as directories that provide sign-up and sign-in options for your app users. User Pool makes it easy for developers to add sign-up and sign-in functionality to web and mobile applications. It serves as your own identity provider to maintain a user directory. It supports user registration and sign-in, as well as provisioning identity tokens for signed-in users.
- Identity pools, which enable you to grant your users access to other AWS services.
For Unicorn Pursuit, we need to limit our “voting body” by email, so we need a User Pool, and ideally we’ll enable people from our email domain to auto-register.
User pools can either be configured so that user name is primary sign in form, but also allows for the other parameters, such as email address or a “preferred name” to be used additionally; or it can be configured so that email and/or phone numbers are the only ways a user can register and sign in.
Attributes represent the various properties of each user that’s collected and stored in the user pool. Cognito provides a set of standard attributes that are available for all user pools. Users are allowed to select any of these standard attributes to be required. Users will not be able to sign up to the user pool without providing the required attributes. Besides these, additional attributes can be further defined, and are known as custom attributes.
Cognito sends emails to users in the user pool, when particular actions take place, such as welcome emails, invitation emails, password resets, etc. By default, user pools are configured to use Cognito built-in email capability, but it can also be configured to use Amazon SES, however, support for Amazon SES is not available in the CDK yet (May 2020).
App Client: an app is an entity within a user pool that has permission to call unauthenticated APIs (APIs that do not have an authenticated user), such as APIs to register, sign in, and handle forgotten passwords. To call these APIs, you need an app client ID and an optional client secret.
After setting up an app client, the address for the user pool’s sign-up and sign-in webpages can be configured using domains. There are two ways to set up a domain:
- Amazon Cognito hosted domain can be chosen with an available domain prefix.
- Custom domain name can be chosen. The custom domain must be one that is already owned, and whose certificate is registered in AWS Certificate Manager, as described here.
Code
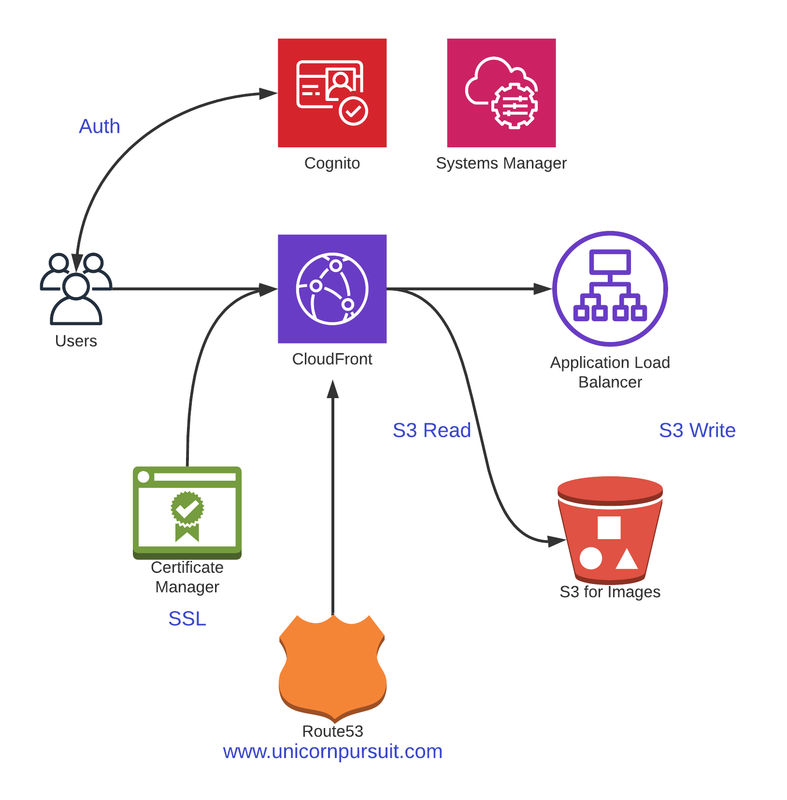
Before we get into Code, let’s understand what we’re building. Check out the diagram below:
Requirements
We need to configure a User Pool, and we want our users to sign up using their corporate email and a user name. An email needs to be sent to users with a confirmation link, before they can access the web.
Attributes the user needs to give us when signing up are:
- email address
- username
- full name
Users policy needs to be at least 12 characters long, and needs to include upper and lower case, numbers and symbols.
We then need to configure an App Client, and associate it with our Unicorn User Pool.
There are 2 options:
- Hosted UI, recommended to quickly “integrate” Congito UI in your Frontend, if you’re using VUE, React or Angular.
- Custom UI, that we’d make on our Frontend.
Since Cognito is a very important service, we will cover both options here. For Unicorn Pursuit, we will be using the Option 2 - Custom UI.
Configuration - Hosted UI
Don’t forget to ADD the Cognito to the requirements.txt before importing to the library.
pip install aws-cdk.aws-cognito
pip install -r requirements.txt
pip freeze > requirements.txt
Ok, let’s go to our iac_stack.py and modify the imports:
from aws_cdk import (
    aws_s3 as s3,
    aws_dynamodb as ddb,
    aws_cognito as cognito,
    core
)
We will be using CDK AWS Python UserPool Cognito class.
Ideally, we would have some kind of SSO, like AWS SSO o using Azure AD, but in this case, we’ll assume we’re using this app a bit more “openly”, and we won’t to create a separate User Pool.
By using an Amazon Cognito user pool, you can create and maintain a user directory, and add sign-up and sign-in to your mobile app or web application.
By default, self sign up is disabled, but for Unicorn Pursuit we do want our users to sign up… and we’ll spice it up with some security by only allowing certain email extensions. So, to sum up:
- We’re creating a user pool manually, adding domain check as security method.
- We will require users name and email address. We can use an email as a username.
- Password policy, as per requirements.
Let’s out the cdk diff, to see which new resources we’re creating:

Looks all right, let’s go for cdk deploy, and observe:

Cool, let’s check the results:
aws cognito-idp list-user-pools --max-results 20

UserPools:
- CreationDate: '2020-05-04T16:25:50.578000+02:00'
  Id: eu-west-1_3ryklNgoR
  LambdaConfig: {}
  LastModifiedDate: '2020-05-04T16:25:50.578000+02:00'
  Name: CognitoUnicornUserPool
All good, User Pool created! Let’s now go for App Client, and then Domain.
client = userpool.add_client("UnicornAppClient")
client_id = client.user_pool_client_id
Cool, so good so far… now let’s make sure to actually add client to the User Pool. This here is THE Ninja move of Cognito, simply because you have so many options in Cognito on how to authenticate and later authorize.
## Cognito: Create App Client & create Authentication Flow with User and Password
client = userpool.add_client(
"UnicornAppClient",
user_pool_client_name="UnicornAppClient",
generate_secret=False,
auth_flows=cognito.AuthFlow(
    admin_user_password=False,
    custom=False,
    refresh_token=True,
    user_password=False,
    user_srp=False
    ),
o_auth=cognito.OAuthSettings(

   ## We'll allow both Flows, Implicit and Authorization Code, and decide in the app which to use.
   flows=cognito.OAuthFlows(
  authorization_code_grant=True,
  implicit_code_grant=True,
   ),

   ## If you don't have any preferences, it's all right to allow all scopes.
   scopes=[cognito.OAuthScope.EMAIL,cognito.OAuthScope.OPENID,cognito.OAuthScope.PHONE,cognito.OAuthScope.PROFILE,cognito.OAuthScope.COGNITO_ADMIN],

   ## We need to define our CALLBACK URL, meaning - where our users are redirected when authenticated.
   callback_urls=["https://www.unicornpursuit.com"]
    )
)
(.env) ➜  iac git:(dev) ✗ cdk diff
Stack UnicornIaC
Resources
[+] AWS::Cognito::UserPoolClient CognitoUnicornUserPool/UnicornAppClient CognitoUnicornUserPoolUnicornAppClientA01194FB
We can cdk deploy this quickly, and proceed with the domain. This one might get a bit more complex, if you’re interesting in using your own domain (custom domain).
If you’re fine with using cognito-assigned URL with a custom prefix, this is the code:
userpool.add_domain("CognitoDomain",
    cognito_domain={
   "domain_prefix": "unicornpursuit"
    }
)
However, we’re going for “auth.unicornpursuit.com”, as we’re building something ready for production, so before we configure, we need to make sure:
- Subdomain exists (if you’re using Route 53, you need to create a new hosted zone called auth.yourdomain.com, and copy the NS record from the auth to the root)
- You have a SSL for either a wildcard (*.yourdomain.com) or a specific auth.yourdomain.com. In AWS Certificate Manager, you can use a single SSL for both, root and the wildcard, and that’s what we did here.
If we use Certificate Manager, we need to make sure Certificate Manager CDK library is in our requirements.txt file, and imported to our iac_stack.py, which makes the import like this for the moment:
from aws_cdk import (
    aws_s3 as s3,
    aws_dynamodb as ddb,
    aws_cognito as cognito,
    aws_certificatemanager as acm,
    core
)
When in Certificate Manager, be sure to add both root and wildcard:
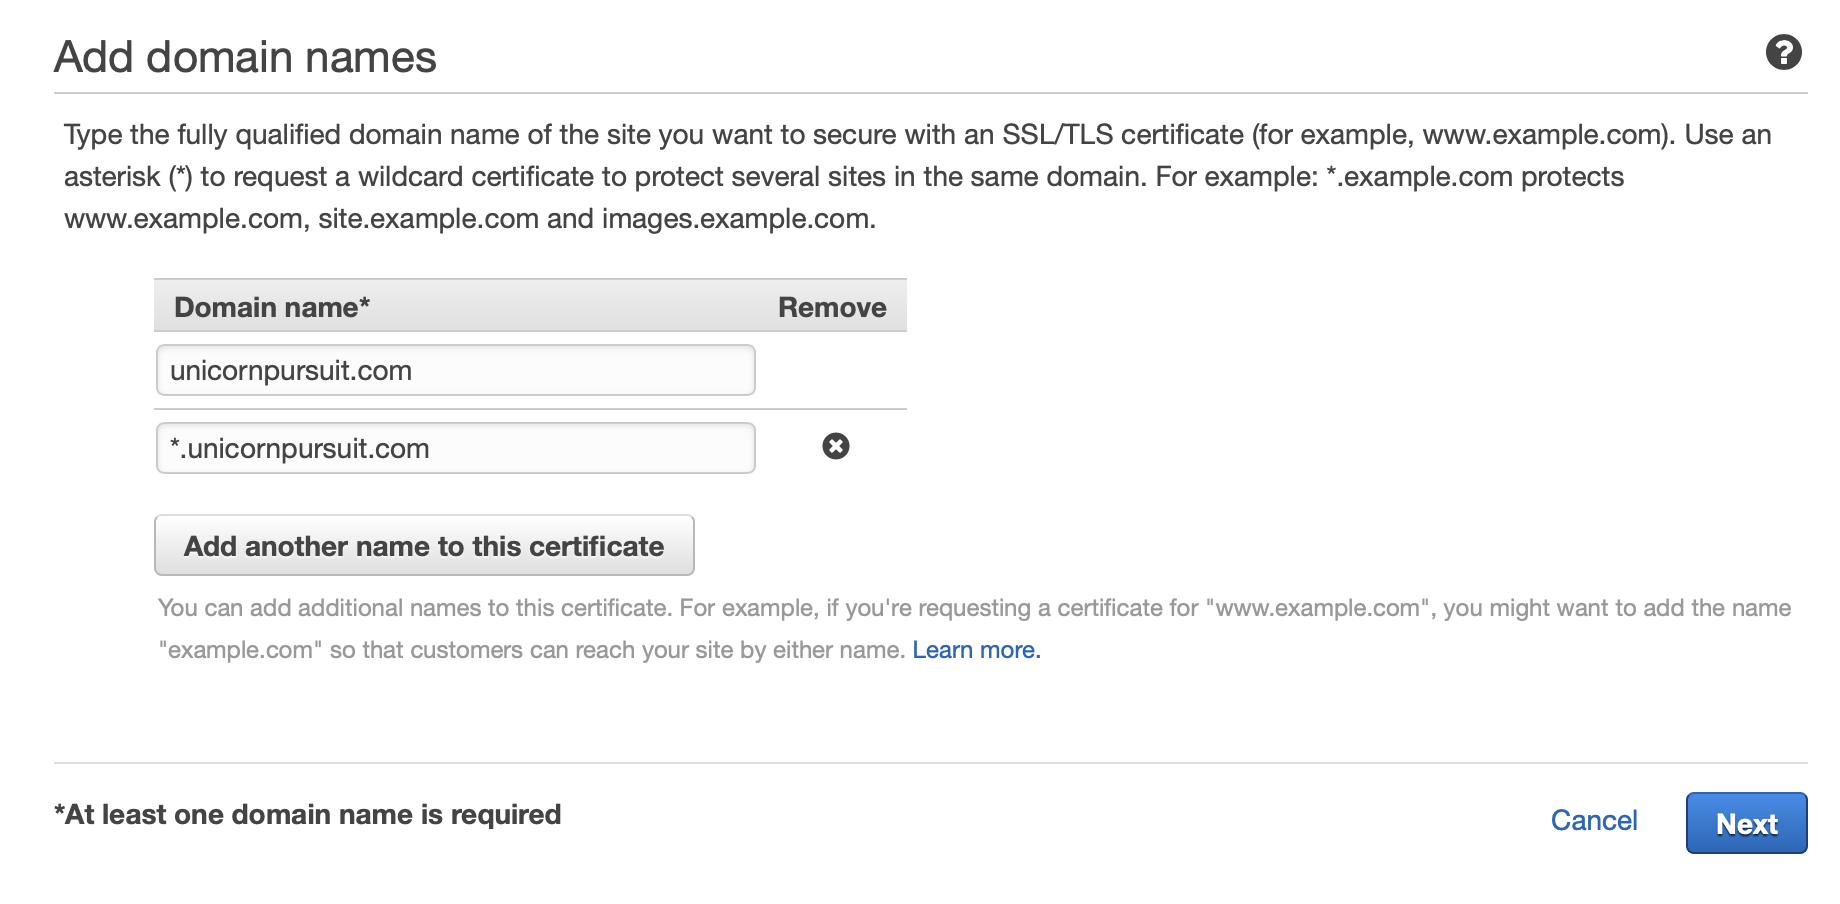
If your domain is on Route53, you can just click on “create a record”. If not - you need to manually create a CNAME, and copy/paste the values.
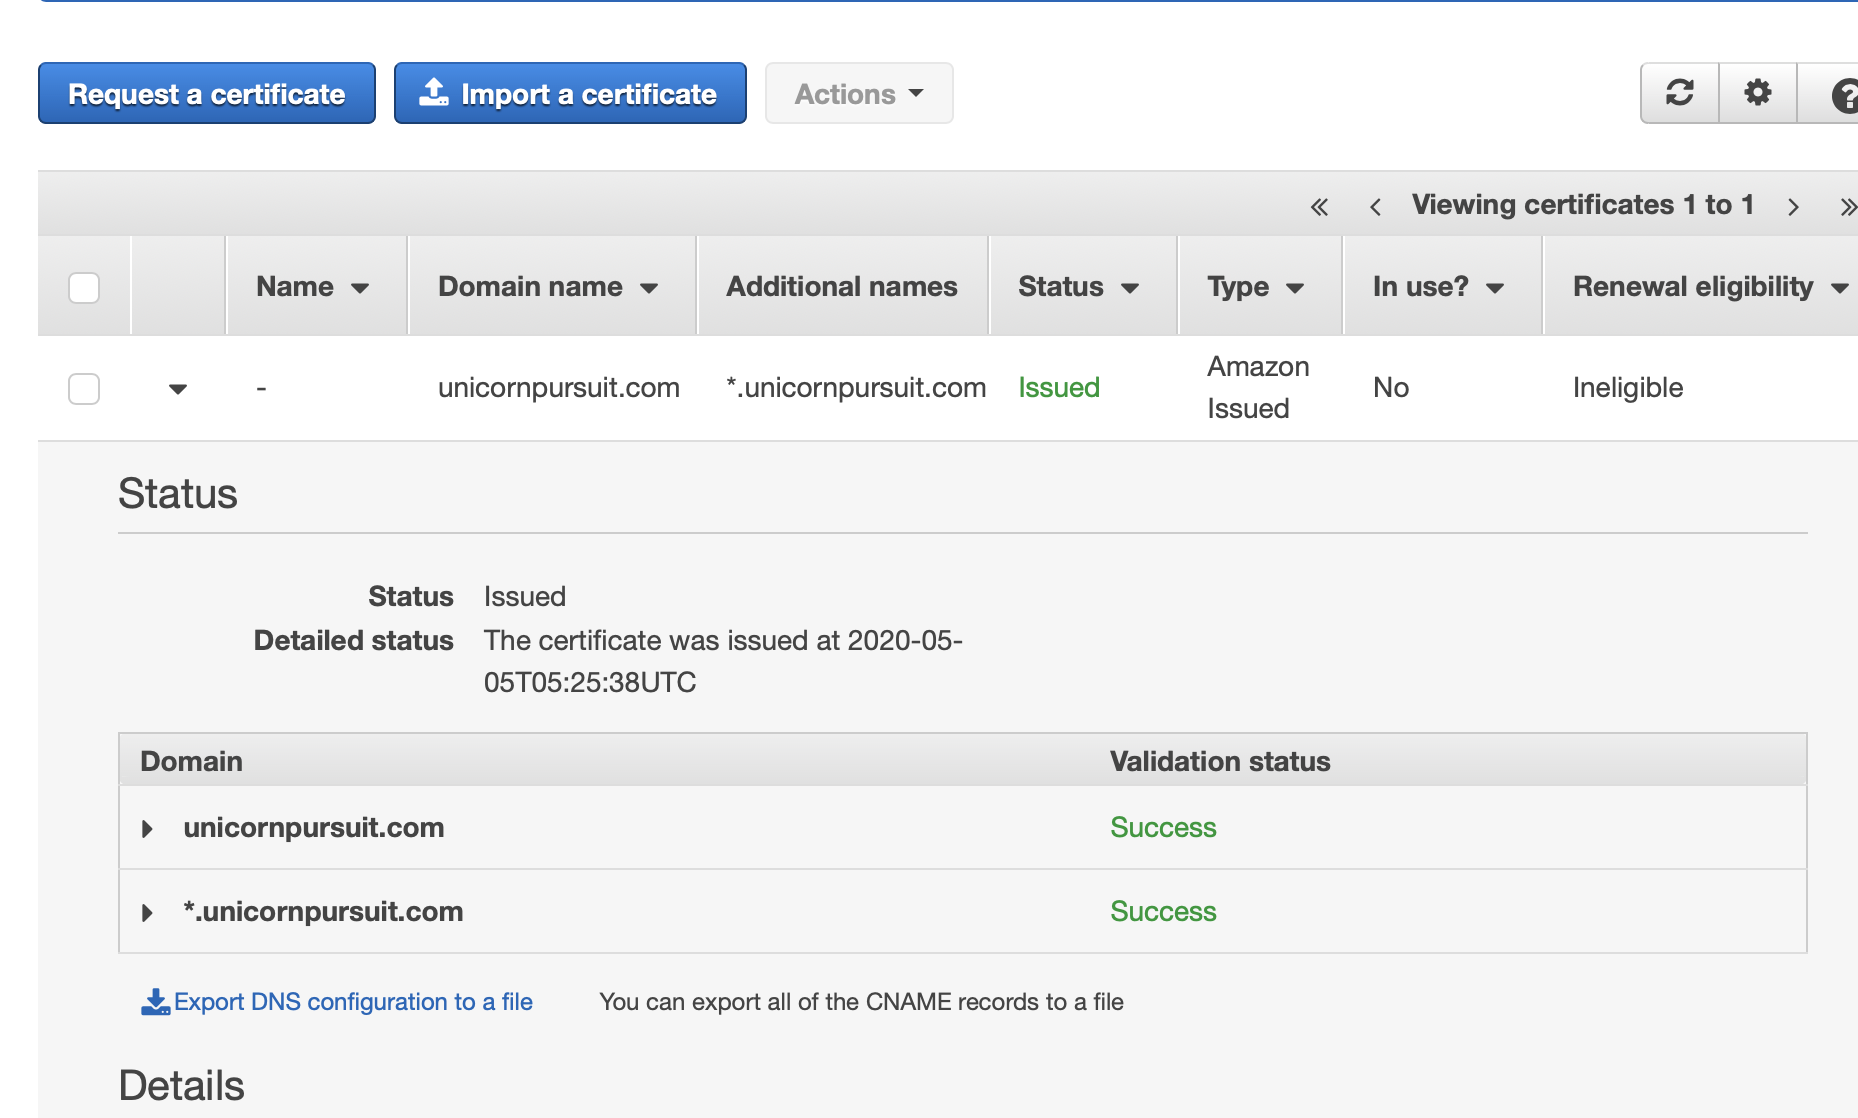
Copy certificate ARN, and create a new variable certificate_arn, as shown in the code below:
certificate_arn="PASTE_YOUR_SSL_ARN_HERE"
domain_cert = acm.Certificate.from_certificate_arn(self, "domainCert", certificate_arn)

userpool.add_domain("UnicornPursuitDomain",
  custom_domain={
    "domain_name": "auth.unicornpursuit.com",
    "certificate": domain_cert
  }
)
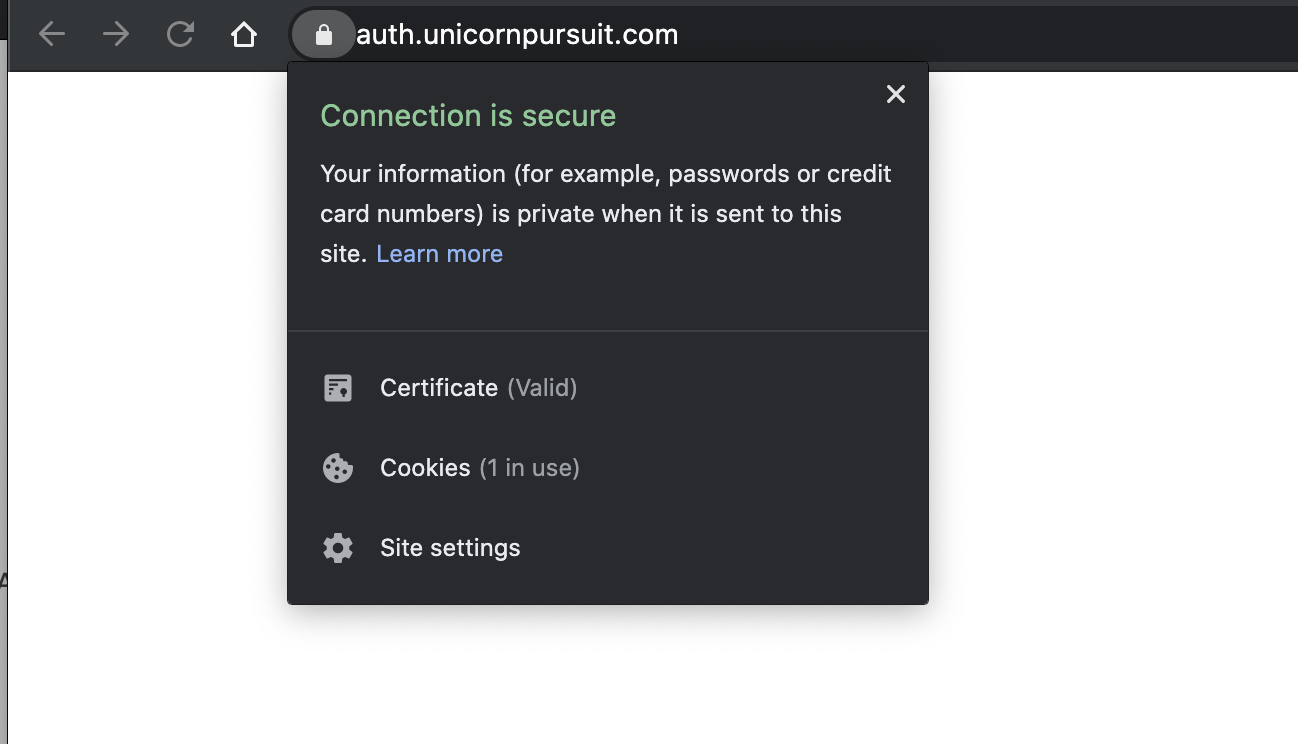
Before you can use this domain, you must add the alias target to your domain’s DNS record. If you’re using Amazon Route 53 to manage your domain, you can do that from the Route 53 console. If you go to Cognito User Pools - App Integration - Domain Name, you will be given the Target you need to configure to Route53 (or where ever your domain is hosted) ALIAS A Record. Only once you do this, you’ll be able to go to the AUTH web page… and even though you won’t get any content, you will make sure SSL is in place:
Ok, all good… let’s deploy, shall we?
…

Why are we getting this error? Because at the moment, our root domain unicornpursuit.com doesn’t have an A record, so it doesn’t really “point” anywhere, so the subdomain auth.unicornpursuit.com also cannot “operate”.
How do we solve it? We have 2 options:
- We build something quickly, like static html in S3 + CloudFront cause S3 cannot host https, RECOMMENDED.
- We wait till out app is done, and come back to this part.
Time to cdk synth our CloudFormation Template. The entire Cognito part looks like this:
...

  CognitoUnicornUserPoolsmsRoleD1ABE037:
    Type: AWS::IAM::Role
    Properties:
 AssumeRolePolicyDocument:
   Statement:
     - Action: sts:AssumeRole
  Condition:
    StringEquals:
 sts:ExternalId: UnicornIaCCognitoUnicornUserPool358A89E2
  Effect: Allow
  Principal:
    Service: cognito-idp.amazonaws.com
   Version: "2012-10-17"
 Policies:
   - PolicyDocument:
  Statement:
    - Action: sns:Publish
 Effect: Allow
 Resource: "*"
  Version: "2012-10-17"
     PolicyName: sns-publish
 Tags:
   - Key: project
     Value: unicorn
   - Key: bu
     Value: cloud
   - Key: environment
     Value: prod
    Metadata:
 aws:cdk:path: UnicornIaC/CognitoUnicornUserPool/smsRole/Resource
  CognitoUnicornUserPool1C6E3F95:
    Type: AWS::Cognito::UserPool
    Properties:
 AdminCreateUserConfig:
   AllowAdminCreateUserOnly: false
 AliasAttributes:
   - email
 AutoVerifiedAttributes:
   - email
 Policies:
   PasswordPolicy:
     MinimumLength: 12
     RequireLowercase: true
     RequireNumbers: true
     RequireSymbols: true
     RequireUppercase: true
 Schema:
   - Name: email
     Required: true
   - Name: name
     Required: true
 SmsConfiguration:
   ExternalId: UnicornIaCCognitoUnicornUserPool358A89E2
   SnsCallerArn:
     Fn::GetAtt:
  - CognitoUnicornUserPoolsmsRoleD1ABE037
  - Arn
 SmsVerificationMessage: The verification code to your new account is {####}
 UserPoolName: CognitoUnicornUserPool
 UserPoolTags:
   project: unicorn
   bu: cloud
   environment: prod
 VerificationMessageTemplate:
   DefaultEmailOption: CONFIRM_WITH_LINK
   EmailMessageByLink: Hello {username}. Welcome to Unicorn Pursuit! Follow the link {##Verify Email##} to confirm your email address.
   EmailSubjectByLink: "Unicorn Pursuit: Verify your email"
   SmsMessage: The verification code to your new account is {####}
    Metadata:
 aws:cdk:path: UnicornIaC/CognitoUnicornUserPool/Resource
  CognitoUnicornUserPoolUnicornAppClientA01194FB:
    Type: AWS::Cognito::UserPoolClient
    Properties:
 UserPoolId:
   Ref: CognitoUnicornUserPool1C6E3F95
 ClientName: UnicornAppClient
 ExplicitAuthFlows:
   - ALLOW_USER_PASSWORD_AUTH
   - ALLOW_REFRESH_TOKEN_AUTH
    Metadata:
 aws:cdk:path: UnicornIaC/CognitoUnicornUserPool/UnicornAppClient/Resource
  CognitoUnicornUserPoolUnicornPursuitDomainF41B2E5C:
    Type: AWS::Cognito::UserPoolDomain
    Properties:
 Domain: auth.unicornpursuit.com
 UserPoolId:
   Ref: CognitoUnicornUserPool1C6E3F95
 CustomDomainConfig:
   CertificateArn: arn:aws:acm:us-east-1:TEXT_NOT_DISCLOSED
    Metadata:
 aws:cdk:path: UnicornIaC/CognitoUnicornUserPool/UnicornPursuitDomain/Resource
  CDKMetadata:
    Type: AWS::CDK::Metadata
Once unicornpursuit.com is “operational”, either the “temporary"S3 + CloudFront Version or the final one, the CDK deploy goes smoothly:

Awesome!!!
Configuration - Custom UI
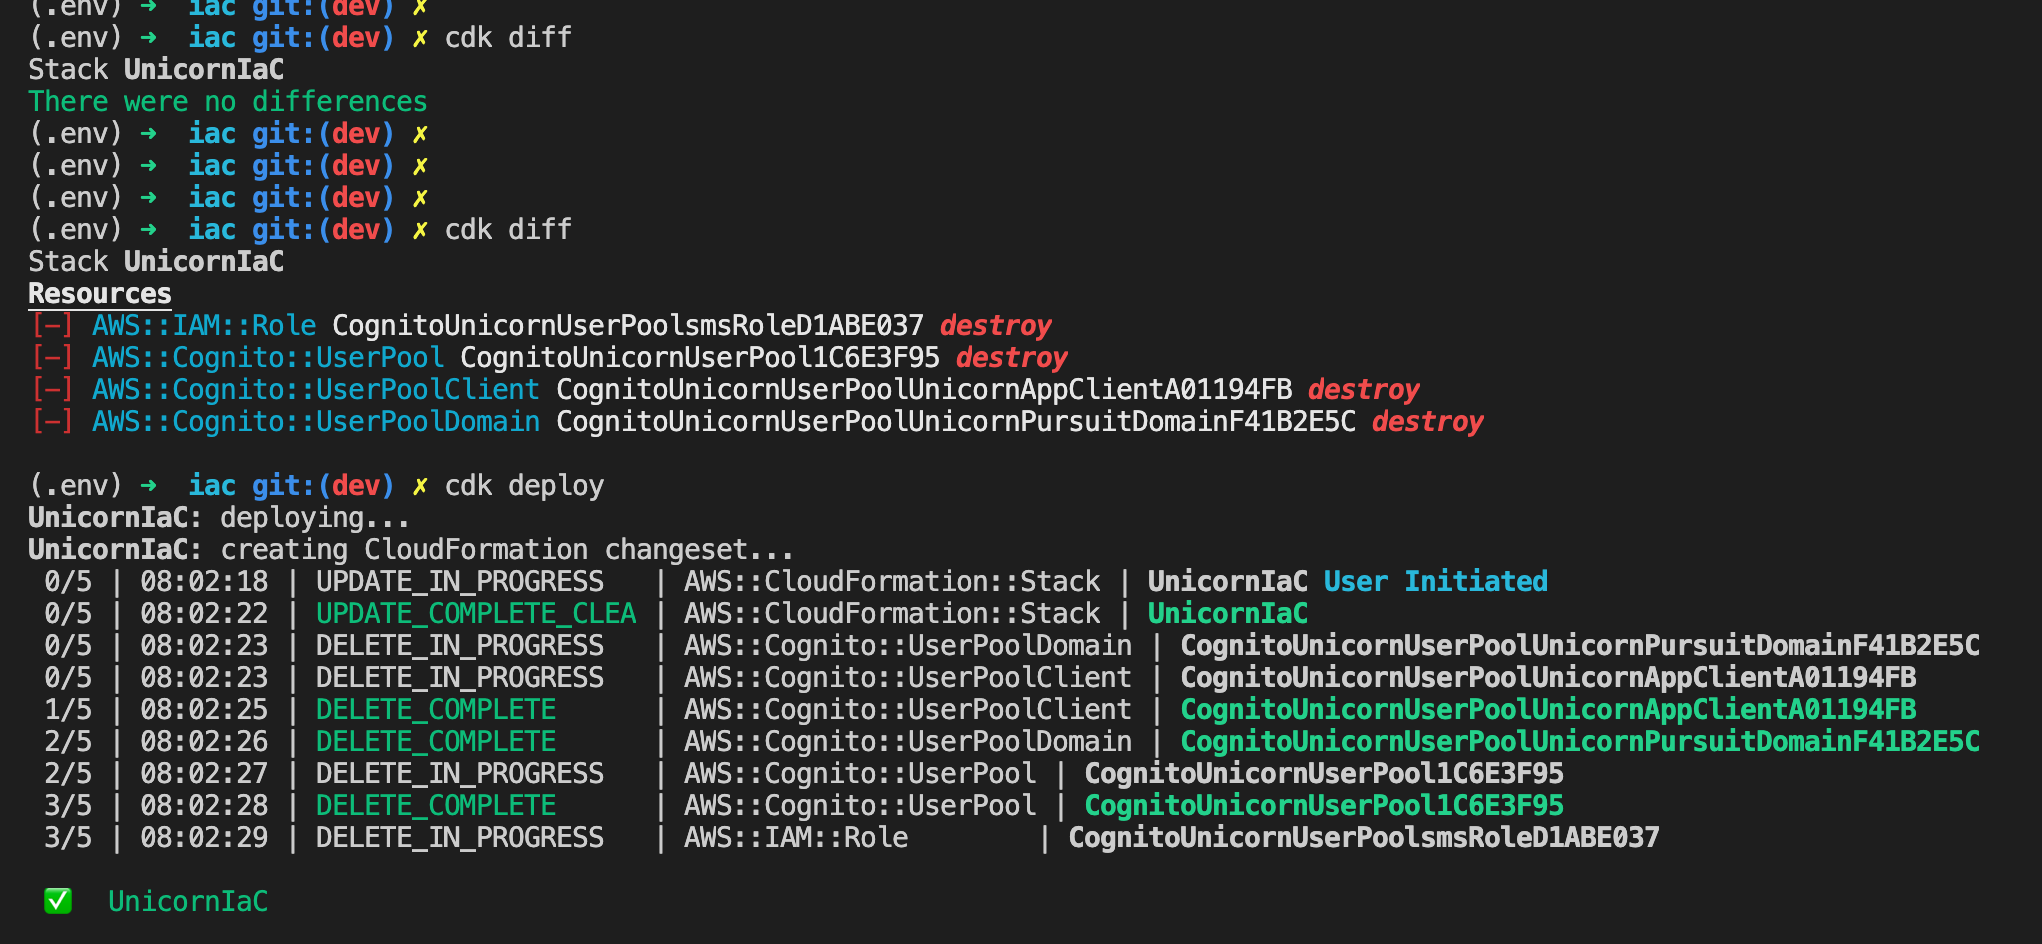
Let’s say we first did an Option 1 for exercise, which I would totally recommend. We first need to delete our Cognito Resources, and then create a fresh new user pool with USER_PASSWORD and TOKEN options.
Ok, so the new plan is to create a User Pool, and Client App that allows us to Sign Up, confirm our Phone Number using OTP (One Time Password), and Sign In. All the User Pool TOKENs will be handled in our Golang code.
The new Python code would look like this:
   # Cognito: Create User Pool
   userpool = cognito.UserPool(
  self, "CognitoUnicornUserPool",
  user_pool_name="CognitoUnicornUserPool",
  self_sign_up_enabled=True,

  ## Require username or email for users to sign in
  sign_in_aliases=cognito.SignInAliases(
      username=False,
      email=True,
  ),
  # Require users to give their full name when signing up
  required_attributes=cognito.RequiredAttributes(
      fullname=True,
      email=True,
      phone_number=True
  ),
  # Verify new sign ups using email
  auto_verify=cognito.AutoVerifiedAttrs(
      email=False,
      phone=True,
  ),
  # Configure OTP Settings ()
  user_verification=cognito.UserVerificationConfig(
      sms_message="Hey Unicorn Hunter, welcome to Unicorn Pursuit! Your OTP is {####}",
  ),
  # Set up required password policy
  password_policy=cognito.PasswordPolicy(
      min_length=12,
      require_symbols=True,
      require_lowercase=True,
      require_uppercase=True,
      require_digits=True,
  )
   )

   ## Cognito: Create App Client & create Authentication Flow with User and Password
   client = userpool.add_client(
  "UnicornAppClient",
  user_pool_client_name="UnicornAppClient",
  generate_secret=False,

  ## We'll allow both Flows, Implicit and Authorization Code, and decide in the app which to use.
  auth_flows=cognito.AuthFlow(
      admin_user_password=False,
      custom=False,
      refresh_token=True,
      user_password=True,
      user_srp=False
      ),
   )
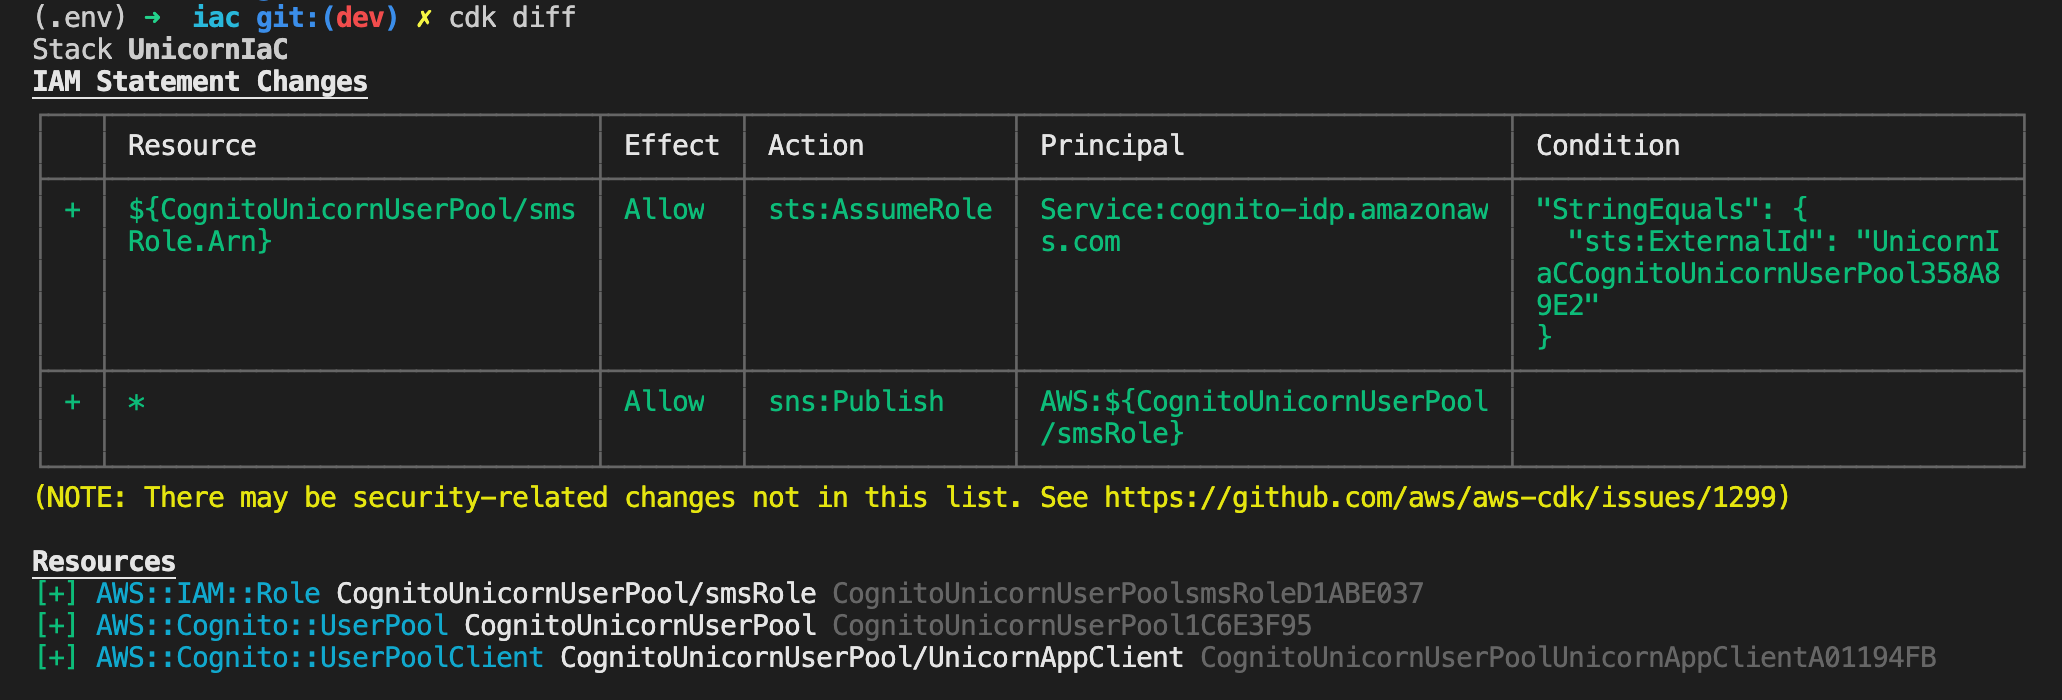
CDK tells us the differences:
And the synthesized CloudFormation Template:
  CognitoUnicornUserPool1C6E3F95:
    Type: AWS::Cognito::UserPool
    Properties:
 AdminCreateUserConfig:
   AllowAdminCreateUserOnly: false
 AliasAttributes:
   - email
 AutoVerifiedAttributes:
   - phone_number
 EmailVerificationMessage: Hello {username}, Your verification code is {####}
 EmailVerificationSubject: Verify your new account
 Policies:
   PasswordPolicy:
     MinimumLength: 12
     RequireLowercase: true
     RequireNumbers: true
     RequireSymbols: true
     RequireUppercase: true
 Schema:
   - Name: email
     Required: true
   - Name: name
     Required: true
   - Name: phone_number
     Required: true
 SmsConfiguration:
   ExternalId: UnicornIaCCognitoUnicornUserPool358A89E2
   SnsCallerArn:
     Fn::GetAtt:
  - CognitoUnicornUserPoolsmsRoleD1ABE037
  - Arn
 SmsVerificationMessage: Hey {username}, welcome to Unicorn Pursuit! Your OTP is {####}
 UserPoolName: CognitoUnicornUserPool
 UserPoolTags:
   project: unicorn
   bu: cloud
   environment: prod
 VerificationMessageTemplate:
   DefaultEmailOption: CONFIRM_WITH_CODE
   EmailMessage: Hello {username}, Your verification code is {####}
   EmailSubject: Verify your new account
   SmsMessage: Hey {username}, welcome to Unicorn Pursuit! Your OTP is {####}
    Metadata:
 aws:cdk:path: UnicornIaC/CognitoUnicornUserPool/Resource
  CognitoUnicornUserPoolUnicornAppClientA01194FB:
    Type: AWS::Cognito::UserPoolClient
    Properties:
 UserPoolId:
   Ref: CognitoUnicornUserPool1C6E3F95
 ClientName: UnicornAppClient
 ExplicitAuthFlows:
   - ALLOW_USER_PASSWORD_AUTH
   - ALLOW_REFRESH_TOKEN_AUTH
 GenerateSecret: false
    Metadata:
 aws:cdk:path: UnicornIaC/CognitoUnicornUserPool/UnicornAppClient/Resource
  CDKMetadata:
    Type: AWS::CDK::Metadata
    Properties:
Where to find more info
- Cognito auto-generated Construct Library with Examples
- How to host a static website with https using amazon s3
- Add Sign-in with a SAML Identity Provider
Feedback
Was this page helpful?
Awesome! Please tell us how we can improve.
Sorry to hear that. Please tell us how we can improve.